Monday, February 28, 2011

Introducing Simply Susan...

Well, kind of. I volunteered to make a clutch for a charity auction next month. As I was planning the clutch (which I had never made before and didn't have a pattern - why do I do things like this??) I thought it would probably be good to put a label on it so it looks more "professional" ...or something. Maybe I was just getting carried away. Ok, ok I was definitely getting carried away.

Sometime while I was scheming designing the pattern and label, I came up with Simply Susan. Because, while I like things that are cute and charming, I'm not really into giant bows or hot pink ruffles (usually). I like things that are stylish and functional, but simple at the same time. The Susan part is because my name is Susan (duh).
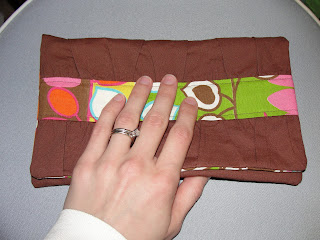
I'm pretty happy with the label considering I have no artistic background or talent and it was created with the ultra professional paintbrush program on my mac (hah!). And now I'll stop stalling and show you the finished product (of which I am oh so proud since it involved lots of new things for me)!
This clutch is a result of looking at Etsy shops, looking at ideas/tutorials on blogs, and what I prefer in a small bag. I've recently started carrying a Very Bradley wristlet and LOVE it! I definitely could not tackle one of those at my skill level, but I tried to incorporate some of the conveniences into this. Plus this is a little bigger so you can fit more than just your phone and id/credit card (meaning, your lips don't have to suffer since your chapstick is at home and your husband isn't disappointed when you say you don't have any kleenex or a pen with you...again).
I went for snap instead of zipper because if you only have one hand free a magnetic snap is much easier. Don't worry though, your precious chapstick won't fall out because there's also a zipper pocket inside! (Also, I may be slightly addicted to Softlips.)
I was so scared of trying a zipper. The snap was surprisingly easy, but the zipper was more challenging. Would you laugh at me if I told you I was actually shaking a little bit during the zipper part because I was nervous? Maybe you wouldn't if you knew I had to Google what the zipper foot for my sewing machine looks like. Or that I looked up several zipper tutorials while trying to figure it out.

For those of you that are still scared of the zipper, don't be so afraid that you skip a project you're in love with. I tackled it and I'm no professional. I may come up with a tutorial for the zipper soon with lots o' pictures and easy easy instructions for other people like me. : ) Then maybe it won't be so scary for other people because I do think the zipper pocket takes this up a notch.
There are also two slots for an id or credit card. That little white patch is the label. I had some iron on transfer paper leftover from making a shirt in college 3 years ago, I knew there was a reason to hang onto that stuff!
Another important feature for me was that the inside was big enough for a phone to fit vertically or horizontally. I'm not sure how I got stuck on that necessity, but it is big enough for my phone and/or an iphone (I used my ipod touch to test it out) to fit in both directions. I may try to add a strap that you can tuck inside or have on the outside next time. And just to give you an idea of the size...
Anyway, I hope you like it! And more importantly, I hope other people like it so they'll bid on it! (Sorry for the marathon blog post, there were so many things I wanted to mention I had a hard time cutting things out! Thank you, thank you for sticking with me if you got this far!) I'd love to hear what you think so I can continue to improve the design!
post signature

Saturday, February 26, 2011

Quick Tip

I just wanted to share a little something I found out about this week. Beverly's is the only craft store in my area (comparable to Michael's or Joann's I think). Ok, after typing Michael's I remembered we do have one of those, but they don't sell fabric. Anyway I went to their website the other day to look for something and saw "Deal of the Day."

What's Deal of the Day? Oh, just a little thing where they sell certain fabrics for only $2.97 per yard. They feature 3 fabrics a day, and the sale is only good for 24 hours (hence the day part of the title). $2.97!?! And they feature some really cute prints. You still have to pay for shipping, which makes it a little more expensive, but still below what a normal sale price would be.

The deal has been on their main website whenever I look. Here's a link to their blog as well, which points out the deal of the day. As excited as I am about sharing this news, I cannot be held responsible for the massive amounts of fabric you may purchase because of this sale ; )

In other news, I've been working on a clutch for a charity auction and I'll be excited to share it next week (or whenever I finish, but hopefully next week). The project requires me tackle a few things I've never done before and so far so good! Oh, and I didn't have a pattern so I had to kind of make one up...yeah, that was a lot of work (what was I thinking???). Hope everybody is having a great weekend!
post signature

Wednesday, February 23, 2011

Headband!!!

I am pumped! I just finished making this headband...
...and it's one of the few projects that turned out EXACTLY how I wanted! Oh, and did I mention it's reversible? Because it is! (prepare yourself for more exclamation points, I'm in a good mood : ) Really, look how excited I am...
...this was really easy. I'm not sure how long it took me because I fit it in on my breaks from work. It's slightly wider in the middle and tapers toward the back. It's a little snug right now, but I'm counting on the elastic stretching out a bit.
(poor picture quality compliments of photobooth, I didn't feel like busting out my camera and I was caught up in the excitement)
I found this lovely fabric on clearance a couple weeks ago. Clearance!? Usually that section is for ugly, itchy fabrics. I've been wanting to use it for something, but I'm scared to try a project with a zipper haven't had the time. Then I saw a headband on Etsy and, as is my custom, I thought I could make it myself!

I pulled out all the stops to make this (kind of). Ok, really I just mean that I traced a pattern on computer paper and actually pressed the seams, which I never do. And am I the only one who feels like I have giant fingers incapable of performing fine motor tasks when I try to press the seam right on the edge? I'm pretty bad with sewing terminology so I might not even be describing the right thing. I had already sewed around it once then turned it right side out. Then I needed to press the edges so I could sew around the whole thing again and close up the hole with the elastic.

Anyway, I managed to press the edges or whatever I was doing and finish it up. I'm definitely going to make more of these in the future!

post signature

Monday, February 21, 2011

My Craftology

I thought I'd share how I go about crafting/picking out crafts to try. To preface this, let me tell you I am not an expert in anything (at least not anything crafty...ok, maybe not in anything...that's slightly depressing). Usually things break down like this: I see something on Etsy or in a store and think, "OO! I could make that!! And I would save money and it would be more special because I made it!" At this point I'm pretty very excited about the possibilities. I mean how hard could it be to make this?
After all, Hubs has a wood burning kit, and I even used it once. Nevermind the fact that I can't draw with a pen, let alone a fiery hot metal tip. Or the fact that I don't know how to change out the tips to the wood burning thingy. Or the fact that I call it a wood burning thingy. Yes, I will definitely do this. And add our last name to it like it's our family tree kind of. Perfect. I will go buy wood at Michael's right now.

Then I get home and realize I have no idea what I'm doing. Along with slightly panicking, I look some stuff up online. Probably trace something since I can't draw. Possibly scrap the tree idea and go for just a cool font with our names. (I actually did do a wood burning thing with our names and wedding date for our anniversary. Turned out pretty well, all things considered.) So then I can add wood burning to be repertoire. But I will know that I cannot make that lovely tree up there, which means I will probably not try wood burning again for quite a while.

Crocheting had a very similar beginning for me. We needed stockings for our first Christmas together as a married couple in our own little apartment. I will crochet some! Of course! Because I've never crocheted before, I don't own any needles, or any yarn! This. Is. PERFECT!!!

That's basically how it went. I think I saw a pattern or a picture or something online that sparked that train of thought. Thankfully Hubs' mom crochets, and she was able to give me pointers. I also checked out a book on learning to crochet from the library...from the kids section of the library. (Do you realize how much easier the explanations are? And how much better the pictures are? Well they're a lot better!) I spent many a lunch break at work crocheting those stockings. And much to my surprise, ta-da!
 
The green one had something in it in this picture, which is why it looks kinda lumpy.
Just so you know, there was much more involved than ...ta-da! There was quite a bit of reading and re-reading the pattern and Googling because I had no idea what ch1, 2hdc, 5sc, decrease 2st meant. (Don't try that by the way, I just made that up, it would probably be a terrible crocheted train wreck!) And now I have a bag full of yarn (most of which I inherited from other people, I think I've only bought a handful of skeins) and crochet maybe once every month or two (but still definitely Google most stitches and occasionally have to enlist the tutoring of a YouTube video).

Other projects, like my froggy frame, get stuck in the closet, moved 2000 miles cross country only to go in another closet and THEN I finally tackle them. Hey, at least I finished...even if it was 2 years and 2000 miles later. 

So that's my crafting in a nutshell. I don't know very much about any technique, but I'm willing to try pretty much anything. The trend seems to be that I'm more likely to try if the craft is well above my current skill level. : / Oh well, at least that means I'm making progress! I'm currently enjoying getting in way over my head soaking up all the various ideas in the crafty blog world. Do you have any (slightly more sane) methods for picking new projects to work on?
post signature

Thursday, February 17, 2011

Barnyard Finger Puppets

I finally finished my 2nd set of crocheted finger puppets! I'm noticing a trend of "finally" finishing things...so either I'm really impatient or it actually takes me a long time to finish these things. Here's a link to the patterns. I'll give the pattern for the lamb at the end of this post since I partially made that one up myself.

Now for some disclaimers about the pattern. I still consider myself somewhat of a beginner at crocheting (meaning I've completed less than 10 projects, I don't have all of the different stitches memorized, and I ALWAYS mess up at least once during a project). This pattern doesn't have any complicated stitches (thankfully), but I would be lying if I said it wasn't tedious. All those little features are fairly easy to make, but sewing them on is a drag. I get frustrated when people say things like, "this was so easy!" or "I knocked this out in an evening!" So that will not be the case with these, just being honest. Unless your evening consists of several uninterrupted hours of crocheting. But maybe I'm just slow.

Aaaanyway, the reason I still make them even though it can get tedious is they are so stinkin' cute! I mean check out these feathered friends. I LOVE the comb on the rooster's head! Comb aka red thing on top of a rooster's head - I had to look that one up on Google : )

And they all have cute little tails too!

The whole line-up.

So here's the scoop on the lamb. Last time I made the cute little piggy from the pattern. See?
Awww :) I wish you could see the cute curly tail too. But I had no pink yarn. And I already spent my crafting budget for the next two months didn't feel like buying any, so the lamb was born...er...crocheted. Kind of sad how many brown/tan/khaki/cream yarns I have.

Lamb pattern: make basic body
Muzzle: use pattern for dog muzzle
Ears: chain 4, single crochet in 2nd chain from hook, single crochet in next 2 stitches. Turn and chain 1. Next row - single crochet in 1st stitch; in next stitch do 1 half double crochet, 1 double crochet, and 1 half double crochet; single crochet in last stitch. Fasten off. Fold the ear in half and stitch together. Sew ear to the side of the head.
Face: chain 5, single crochet in 2nd chain from hook, single crochet in next 3 stitches. Turn and chain 1. Next row - 4 single crochet, then fasten off. Sew the face onto the body just above the nose, stitch around the edges of the face.
Tail: gather about 10-12 strands of yarn. Tie together in the center (leave a long tail on the knot to attach to the body), then trim to desired tail length. Fluff the tail (a lot!) to get it to be a little fluffy ball. Attach to the body near the bottom. See the diagram below for a better explanation.
Hopefully my superb drawing skills (hehe) make up for my less than stellar crochet pattern writing skills. Despite all of the griping I did about the details, I think this project is worth the time involved. Just look at their tiny cute faces!
post signature

PS - I'm very sorry for way overusing the word 'cute' in this post. But really...how else would you describe them?

Wednesday, February 16, 2011

Cute Burp Cloths

 
I finally finished working on these burp cloths, not because they're difficult, but because I tend to start 3 different things before I finish one. You can find the pattern here - homemade by jill. I just fell in love with the idea after I saw the tutorial because aren't these just worlds cuter than a plain white cloth diaper? I think so.

They're really simple and after you make one, you really don't even need to read the instructions anymore (which is awesome in my book). There's no pressing or folding and creasing involved, which also makes these awesome...and easy for people like me who are apparently kind of lazy when it comes to sewing. Check out the labels I made for mine:
When I showed Hubs the finished product all tied up and ready to go he told me it looked like they could've come from a store! I don't think Hubs even realized what an awesome compliment that was :) :) I was very excited!
I'm going to be giving these as a gift, and I saw (somewhere in blogland, I can't remember where) a printable for making a label for a "bucket o' burpees." That was cute, but I didn't have a bucket or a Silhouette to cut the cute oval label with scalloped edges. So I made my own. No bucket or equipment required (except a computer, printer, and scissors - I'm assuming if you're reading a blog you have those three). If you click on the picture below, it should open it full size and you can save it for your personal use.
 Pretty sure these are going to be one of my go-to shower gifts from now on!
post signature

Monday, February 14, 2011

No more holes

So today I did a quick fix on one of my favorite workout shirts. I realized the other day that it's almost 9 years old, which means I've worn it maybe...200 times? Somewhere in that ballpark anyway. It had holes in the armpits, and not like, "oh, there's a teeny hole on that seam." More like a, "yikes, time for a new shirt" kind of hole. See?


Hubs suggested the other night at the gym that since I know how to use my sewing machine now, I could just cut the sleeves off and hem the edges. Brilliant! Why didn't I think of that? I think he was at the point where he would basically suggest anything to make the holes go away. Let's face it, Hubs was embarrassed by my holey shirt :/ In my defense, I ONLY wear this shirt to the gym, and I try to wear it on days when we're doing exercises that don't involve me lifting up my arms much. And favorite shirts are hard to come by. Obviously, if I had a comparable shirt I would've stopped wearing this one.

Anyway, my sewing machine (should sewing machines have a name? I don't know, but mine doesn't) has a hemming foot. I thought, "Awesome, I will just put the hemming foot on and my shirt will magically be hemmed, all I have to do is press the pedal!" Hahaha, so much for that fantasy! I couldn't figure out how to work the hemming foot so I put the regular one back on and used what might be the worst method for hemming something, but I don't know the difference and it worked so who cares. I just folded it under all the way around and pinned it. Here's me in action...because obviously I don't have anything better to concentrate on while I'm trying to sew. Hah!


It turned out pretty well. Probably would look more professional if I had used the magical hemming foot, but hey I started with giant embarrassing holes, so I'm pretty sure it could only get better! Now I'll be working out in style...or just a tshirt that doesn't have extra holes.

You're welcome Hubs! :)

post signature

Wednesday, February 9, 2011

Frame Week!

I didn't know it was frame week at our house, but it's working out to be that way because I made another frame. This one has been on the backburner for, mmmm, probably 2 years. I saw this frame at a craft show around the time we got married that said "Welcome to our pad," and it had frogs on it. I was in love, but I wasn't in love with the price. Before you think I'm some kind of weirdo for falling in love with a frog frame, I better explain the frog thing.

Hubs once got me a frog as a gift. Like a live one. I was as shocked as you are at the unusual present at first. Really shocked. And didn't know what to do with a frog in my dorm room. He was an African Clawed Frog, which is completely aquatic so he was basically in a big fish tank. I was slightly horrified when I saw pictures of what they looked like as adults and when I found out they could live for 15-20 years. I thought, "I could still have this frog when I'm 40...and it will look like this!?"


But then I grew to love the little guy (I really did, it is possible to love an aquatic frog!), and named him Gutsy. He was albino like the one above, but sadly, he never got that big and he's not with me today. Poor Gutsy. He got some kind of infection or something and I couldn't figure out what it was or how to fix it, so I let him go in a little creek near my parents house. He swam away, so I guess he still could be alive...it's less depressing to think that anyway. :) So frogs, I like them a lot more than I used to because of Gutsy.

Around the time I saw that frame, I saw some cute wooden frogs at the craft store and decided to make my own frame. I bought the frogs and an unfinished wood frame and a paintbrush. And that's as far as I got. Hah! I guess I was waiting to buy paint or something, who knows. Since I figured out how to use mod podge, I thought blue scrapbook paper + mod podge = I don't need to buy paint! I used rub on letters for the words.
By the way, rub on letters - definitely not my favorite way to get letters on a piece of paper!


So I mod podged the paper to the frame, then hot glued the froggies on. I made some space for the frame in a small built-in bookshelf in the living room. Ah, feels good to be finished...finally.

Aaaand now I'm feeling all nostalgic about Gutsy. So here's a picture of him chillin' by his log.
post signature

Tuesday, February 8, 2011

Family Frame

Woohoo! I finished something in one night! Unfortunately the cost was skipping my workout for the evening. Oh well, I'm not too broken up about it. Back to the frame. I was about 1,000 times more excited about it than Hubs, which is pretty standard. You'd think I would learn after a while he is never going to be as excited about a crafty project as I am. Well I haven't learned yet, maybe after the next project...

I finally went to the dollar store, can you believe we've lived here almost a year and this is my first time? Lucky for me, Beverly's (fabric/crafts store) was on the way! :) :) I've grown very fond of Beverly's since I figured out how to sew and since they send out coupons every month. I relied heavily on inspiration from other blogs for this outing (more came out of this trip than just the frame, stay tuned the rest of the week).

I had a picture we took at Christmas that was hanging out in a sad excuse for a frame I found in the closet (plastic with scrapbook paper taped to it, very pathetic). I decided to upgrade the family picture. I used a dollar store frame, some small wooden letters, mod podge, scrapbook paper, and my glue gun.


Since I don't have a Silhouette (and probably won't unless someone knocks on my door and says, "Please take this Silhouette for free and use it all the time!") I cut out the letters the old fashioned way. Traced the wooden letter onto scrapbook paper and used and exacto knife. By the end of this I was getting pretty stinkin good with that thing, I probably could've cut out cursive! Ok, not really, but I was proud of myself.  


Then I used mod podge for the...get ready...first time! Also, I always thought it was modge podge, not sure where I got that. It was surprisingly easy. So easy, I'm afraid I might start using it way too much - haha. I just put some on the letter and stuck the paper on. Then I put some more mod podge over the top. I'm not really up on the correct mod podge protocol, but that worked for me!

So then I just had to wait a few minutes for it to dry and hot glue those puppies on the frame! How easy was this project? And cheap. I spent about $8 total since I didn't have any mod podge or the letters on hand. If you already had those, you could spend only a couple dollars. I was very excited and happy to give the picture a new (much more classy) home. Hubs...not so much, but he smiled and said "yeah" when I asked if he liked it. I suppose that's enough for me. :) So here's the final product!

I couldn't get a good picture straight on because it's darkish in here and the flash was creating a big glare.

If you haven't taken the plunge and used mod podge, do not be afraid! Or maybe I'm the only one that was living in the dark (non-glued) ages.


post signature

Monday, February 7, 2011

To-Do Help!

I am very curious to find out how in the world some people manage to keep up with everything: having a life, helping their spouse, cleaning, cooking, exercise, and maybe some fun thrown in there too...oh yeah, and I have a full time job. I certainly have not mastered this yet and when I try to tackle everything at once, #1 I rarely actually accomplish everything and #2 I'm exhausted after and neglect everything for a few days. Please tell me I'm not the only one that has trouble here.

When I started this post I had a couple of things in particular I wanted to talk about. Unfortunately, I started it before work this morning and eight hours later I can't really remember the specifics. I'd love to know if you have any tips for keeping up with everything. I'd hate to think how badly our house would go down the drain if I threw kids into the mix right now! Not that I don't want kids, but I think I need a little more housekeeping practice before then, haha.

Remember when I made up that new plan for keeping things clean? Well I'm happy to report it's been going pretty well. I can't say I've stuck to it all the time, but I'd say I'm at about 80-90% right now. And I'm sure this is going to be a shock, but if you clean a little bit everyday, things stay cleaner than if you don't! Gasp! Haha. I'd say my little plan works swimmingly if you actually do what you're supposed to. :) Aren't I just full of groundbreaking revelations today?

Anyway, I'm happy with how things are going, but I did overlook laundry in my cleaning scheme. I did that on purpose because usually laundry is not a problem for me, I do it and I don't usually get behind. Apparently I do get behind if I'm keeping up with all of the household chores, as evidenced by Mount Laundry that appeared over the weekend. It was clean laundry, just not folded or put away. I tend to get stuck at that stage until the pile of clothes in my clean laundry basket is so tall it can't even bear one more sock.

I promise more exciting posts are coming, so stick with me! :) I was out of town for work part of last week...that's my (lame) excuse and I'm sticking to it!

post signature also, I hate the little box around my name. Please make it magically disappear!

As I sat down to cereal dinner, I remembered what I wanted to talk about! We eat kind of a lot of processed foods, and sometimes I feel really bad about that. Even if we do choose "healthy" processed food, I know Lean Pockets are not as good for you as veggies! I also know the way to change that is cook more fresh food. But if a meal dirties more than one extra dish, chances are, I won't make it unless it's a special occasion (I have no dishwasher, so don't judge me too harshly). So please comment with hundreds of wonderful ideas on how to make veggies taste as good as fruit and make meals quickly, cheaply, and using less than 2 dishes! Thanks.

Friday, February 4, 2011

Shout-out to the USO

I haven't been to a USO lounge at the airport before, but they are AWESOME! I was out of town for a meeting and the meeting ended earlier than expected. I couldn't get on an earlier flight home, so the only option was wait until my scheduled flight...7 hours later. 7 hours in the airport. Really was not looking forward to that. So I made my way to the USO lounge, which was back outside of security, but who cares they have internet and food. Anyway, I just wanted to let everyone know how thankful I am for this place. I would be miserable by now and probably out at least $20 between food and internet. Thanks USO! :)

post signature

PS - can't wait to get back home to Hubs!

Wednesday, February 2, 2011

New Post

Well if that isn't a winner of a title, I don't know what is! Hah. I had to do a new post for a couple reasons: I was stuck and needed to do something, anything to get out of the rut and I made a signature so I wanted to try it out and see how it looked with everything.

I haven't made anything new since the last post, sorry I'm so boring. I have no idea how some people seem to create something brilliant every week, or even more than once a week!?

* * *
Breaking news: I left in the middle of writing this post to go watch the Commander's Cup on post (2 mile team race between the services). I caught the end of the womens race (Air Force won by a lot and even lapped the Navy team. Yay!). I was looking around for Hubs, but I hadn't spotted him yet. He was an alternate for the race this time since he hadn't been practicing with the team full time. Then I get a text from Hubs saying if I'm looking for him he's at a clinic off-post because he has a small puncture on his foot. What!? 

I wasn't terribly worried yet because he made it sound not so bad, although I had a feeling he was doing that on purpose. Some of the womens team was standing around behind me at this point and started talking about the guy on the mens team wearing Vibrams that hurt his foot. I turned around to say that was my husband and saw they were pointing at bloody footprints on the concrete. Cue more worry.

So then I called him to ask if he wanted me to come to the clinic (I already knew the answer - no) and find out exactly what happened. We were on the phone long enough for him to tell me to stay and watch the race for him then he said he wasn't supposed to have his phone in there so I didn't get much more info. Men also won by a pretty big margin. Yay! They finished two miles in 11 minutes, 29 seconds. Impressive, huh? The next team to finish was a good 100 yards behind.

I headed to the clinic after that and he was ok, but there is definitely a puncture. Not as big around as a pencil, but definitely bigger than a toothpick. Sorry if that grosses anybody out. Turns out he was jumping down off a small ledge near the track and there was a piece of mulch sticking up in the sidewalk that he didn't see. No stitches even though the medic on post said he needed stitches. Hopefully it won't bother him too much, although the bottom of your foot is pretty much the worst place for something like that.  I think the worst part for him was hearing he couldn't work out for a week - haha.

That was our excitement for the afternoon, and the moral of the story is: watch out for mulch sticking straight up, especially if you are wearing Vibram Five Fingers. I hope everybody else had a less eventful afternoon, maybe I'll get back in gear with crafting and sewing next week!

post signature