Friday, March 4, 2011

Help Desk

My desk seriously, seriously needed help! Here's where I am about 8 hours a day:
Just keeping it real people. That was with no effort to tidy up so I didn't look so messy. You can see I have a whole lot going on there...the "ack!!" pile is coupons, mail...and maybe a headband and some foam letters.

Now, in my defense, I spend 8 hours a day here. So it isn't hard to see how it could get like this. Earlier this week I saw an office that pushed me over the edge and I had to do something about mine. Her before picture was wayyyy better than mine, so I wasn't expecting her results. After being embarrassed about this picture going public, I started cleaning up.

I may or may not have found coupons dating back to July 2010, scraps of fabric, and a charger to a mystery item (really, I have no idea what it goes to but I kept it just in case...which is probably how this mess started in the first place. Oh well). So I'll cut to the chase:
(you may not be able to tell, but it really is more organized not just 'cleaned off')

Ta-da! Ah, that feels so much better. Maybe I'll work twice as fast tomorrow since I have such a tidy workspace...maybe. And I didn't just shove everything in the extra closet or onto Hubs' desk either! Although some things did make it back to his desk...did I mention his desk is a door? A whole entire door on legs. Oh for a desk with some extra real estate. At least I have shelves basically to the ceiling. And I even cleaned out the drawer.
This isn't totally "fixed" (half of the top shelf probably needs to meet the recycling bin), but it's definitely a step in the right direction. I'd love to keep going and make this room a place that I look forward to spending time in. Hopefully something will jump out to me in the next few weeks, but for now I'll be satisfied with a clean desk.
post signature

Tuesday, March 1, 2011

Flat Iron Cover

Have you ever wrapped your still hot flat iron in a dish towel because you were leaving for the airport? No? Well, maybe a less drastic situation...either way, this thing is useful. Like if you only have this much counter space in your bathroom.
Seriously folks, that's all there is. For two people and the junk that accompanies them.
Yep, both of those are me. So really I'm not sure why I didn't have one of these babies before. Oh, actually that might have something to do with not wanting to pay for one. So now that I'm all high on my clutch success I decided to make a cover for my flat iron/straightener (not really sure which term is more correct). If you also have no place for your hot hair tool, here's how I did it.
Measure your tool (this would work for curling irons too). It will likely look way too big, but it won't be. I left an inch extra on each side to account for seams and wiggle room (mine didn't turn out really snug so you could probably get away with a little less).
I doubled the length then added 2 inches for a flap. I cut an outside piece, a lining piece, and some leftover batting. Stack them like this: batting, outside, lining. If you're not sure which way everything should face...what I do is put everything together how it will look in the end, then figure out which seams go together and stack accordingly. Then I pinned. I usually skip this, but when I do I have an issue with things being all wonky by the time I get to the end. So I either have a sewing machine problem, a sewing skills problem, or this is normal.
Sew together, but leave a couple/few inches for turning. Then I skipped ironing the seams and pinning it together. Aaand I forgot to clip the corners, I would've actually liked to do that. Sew up your hole, then assemble the cover. Just fold it in half (2 extra inches on one side for the flap!) and sew around the edges (but not the top...you'll have to leave that open if you want to put the flat iron in the cover).
I added a little velcro and viola!
Hubs will not have to worry about knocking my straightener off our 10 square inches of counter space and I will not have to use a dishtowel when packing. Yay!
post signature

Monday, February 28, 2011

Introducing Simply Susan...

Well, kind of. I volunteered to make a clutch for a charity auction next month. As I was planning the clutch (which I had never made before and didn't have a pattern - why do I do things like this??) I thought it would probably be good to put a label on it so it looks more "professional" ...or something. Maybe I was just getting carried away. Ok, ok I was definitely getting carried away.

Sometime while I was scheming designing the pattern and label, I came up with Simply Susan. Because, while I like things that are cute and charming, I'm not really into giant bows or hot pink ruffles (usually). I like things that are stylish and functional, but simple at the same time. The Susan part is because my name is Susan (duh).
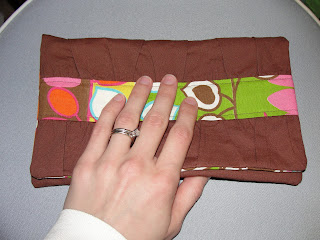
I'm pretty happy with the label considering I have no artistic background or talent and it was created with the ultra professional paintbrush program on my mac (hah!). And now I'll stop stalling and show you the finished product (of which I am oh so proud since it involved lots of new things for me)!
This clutch is a result of looking at Etsy shops, looking at ideas/tutorials on blogs, and what I prefer in a small bag. I've recently started carrying a Very Bradley wristlet and LOVE it! I definitely could not tackle one of those at my skill level, but I tried to incorporate some of the conveniences into this. Plus this is a little bigger so you can fit more than just your phone and id/credit card (meaning, your lips don't have to suffer since your chapstick is at home and your husband isn't disappointed when you say you don't have any kleenex or a pen with you...again).
I went for snap instead of zipper because if you only have one hand free a magnetic snap is much easier. Don't worry though, your precious chapstick won't fall out because there's also a zipper pocket inside! (Also, I may be slightly addicted to Softlips.)
I was so scared of trying a zipper. The snap was surprisingly easy, but the zipper was more challenging. Would you laugh at me if I told you I was actually shaking a little bit during the zipper part because I was nervous? Maybe you wouldn't if you knew I had to Google what the zipper foot for my sewing machine looks like. Or that I looked up several zipper tutorials while trying to figure it out.

For those of you that are still scared of the zipper, don't be so afraid that you skip a project you're in love with. I tackled it and I'm no professional. I may come up with a tutorial for the zipper soon with lots o' pictures and easy easy instructions for other people like me. : ) Then maybe it won't be so scary for other people because I do think the zipper pocket takes this up a notch.
There are also two slots for an id or credit card. That little white patch is the label. I had some iron on transfer paper leftover from making a shirt in college 3 years ago, I knew there was a reason to hang onto that stuff!
Another important feature for me was that the inside was big enough for a phone to fit vertically or horizontally. I'm not sure how I got stuck on that necessity, but it is big enough for my phone and/or an iphone (I used my ipod touch to test it out) to fit in both directions. I may try to add a strap that you can tuck inside or have on the outside next time. And just to give you an idea of the size...
Anyway, I hope you like it! And more importantly, I hope other people like it so they'll bid on it! (Sorry for the marathon blog post, there were so many things I wanted to mention I had a hard time cutting things out! Thank you, thank you for sticking with me if you got this far!) I'd love to hear what you think so I can continue to improve the design!
post signature

Saturday, February 26, 2011

Quick Tip

I just wanted to share a little something I found out about this week. Beverly's is the only craft store in my area (comparable to Michael's or Joann's I think). Ok, after typing Michael's I remembered we do have one of those, but they don't sell fabric. Anyway I went to their website the other day to look for something and saw "Deal of the Day."

What's Deal of the Day? Oh, just a little thing where they sell certain fabrics for only $2.97 per yard. They feature 3 fabrics a day, and the sale is only good for 24 hours (hence the day part of the title). $2.97!?! And they feature some really cute prints. You still have to pay for shipping, which makes it a little more expensive, but still below what a normal sale price would be.

The deal has been on their main website whenever I look. Here's a link to their blog as well, which points out the deal of the day. As excited as I am about sharing this news, I cannot be held responsible for the massive amounts of fabric you may purchase because of this sale ; )

In other news, I've been working on a clutch for a charity auction and I'll be excited to share it next week (or whenever I finish, but hopefully next week). The project requires me tackle a few things I've never done before and so far so good! Oh, and I didn't have a pattern so I had to kind of make one up...yeah, that was a lot of work (what was I thinking???). Hope everybody is having a great weekend!
post signature

Wednesday, February 23, 2011

Headband!!!

I am pumped! I just finished making this headband...
...and it's one of the few projects that turned out EXACTLY how I wanted! Oh, and did I mention it's reversible? Because it is! (prepare yourself for more exclamation points, I'm in a good mood : ) Really, look how excited I am...
...this was really easy. I'm not sure how long it took me because I fit it in on my breaks from work. It's slightly wider in the middle and tapers toward the back. It's a little snug right now, but I'm counting on the elastic stretching out a bit.
(poor picture quality compliments of photobooth, I didn't feel like busting out my camera and I was caught up in the excitement)
I found this lovely fabric on clearance a couple weeks ago. Clearance!? Usually that section is for ugly, itchy fabrics. I've been wanting to use it for something, but I'm scared to try a project with a zipper haven't had the time. Then I saw a headband on Etsy and, as is my custom, I thought I could make it myself!

I pulled out all the stops to make this (kind of). Ok, really I just mean that I traced a pattern on computer paper and actually pressed the seams, which I never do. And am I the only one who feels like I have giant fingers incapable of performing fine motor tasks when I try to press the seam right on the edge? I'm pretty bad with sewing terminology so I might not even be describing the right thing. I had already sewed around it once then turned it right side out. Then I needed to press the edges so I could sew around the whole thing again and close up the hole with the elastic.

Anyway, I managed to press the edges or whatever I was doing and finish it up. I'm definitely going to make more of these in the future!

post signature

Monday, February 21, 2011

My Craftology

I thought I'd share how I go about crafting/picking out crafts to try. To preface this, let me tell you I am not an expert in anything (at least not anything crafty...ok, maybe not in anything...that's slightly depressing). Usually things break down like this: I see something on Etsy or in a store and think, "OO! I could make that!! And I would save money and it would be more special because I made it!" At this point I'm pretty very excited about the possibilities. I mean how hard could it be to make this?
After all, Hubs has a wood burning kit, and I even used it once. Nevermind the fact that I can't draw with a pen, let alone a fiery hot metal tip. Or the fact that I don't know how to change out the tips to the wood burning thingy. Or the fact that I call it a wood burning thingy. Yes, I will definitely do this. And add our last name to it like it's our family tree kind of. Perfect. I will go buy wood at Michael's right now.

Then I get home and realize I have no idea what I'm doing. Along with slightly panicking, I look some stuff up online. Probably trace something since I can't draw. Possibly scrap the tree idea and go for just a cool font with our names. (I actually did do a wood burning thing with our names and wedding date for our anniversary. Turned out pretty well, all things considered.) So then I can add wood burning to be repertoire. But I will know that I cannot make that lovely tree up there, which means I will probably not try wood burning again for quite a while.

Crocheting had a very similar beginning for me. We needed stockings for our first Christmas together as a married couple in our own little apartment. I will crochet some! Of course! Because I've never crocheted before, I don't own any needles, or any yarn! This. Is. PERFECT!!!

That's basically how it went. I think I saw a pattern or a picture or something online that sparked that train of thought. Thankfully Hubs' mom crochets, and she was able to give me pointers. I also checked out a book on learning to crochet from the library...from the kids section of the library. (Do you realize how much easier the explanations are? And how much better the pictures are? Well they're a lot better!) I spent many a lunch break at work crocheting those stockings. And much to my surprise, ta-da!
 
The green one had something in it in this picture, which is why it looks kinda lumpy.
Just so you know, there was much more involved than ...ta-da! There was quite a bit of reading and re-reading the pattern and Googling because I had no idea what ch1, 2hdc, 5sc, decrease 2st meant. (Don't try that by the way, I just made that up, it would probably be a terrible crocheted train wreck!) And now I have a bag full of yarn (most of which I inherited from other people, I think I've only bought a handful of skeins) and crochet maybe once every month or two (but still definitely Google most stitches and occasionally have to enlist the tutoring of a YouTube video).

Other projects, like my froggy frame, get stuck in the closet, moved 2000 miles cross country only to go in another closet and THEN I finally tackle them. Hey, at least I finished...even if it was 2 years and 2000 miles later. 

So that's my crafting in a nutshell. I don't know very much about any technique, but I'm willing to try pretty much anything. The trend seems to be that I'm more likely to try if the craft is well above my current skill level. : / Oh well, at least that means I'm making progress! I'm currently enjoying getting in way over my head soaking up all the various ideas in the crafty blog world. Do you have any (slightly more sane) methods for picking new projects to work on?
post signature

Thursday, February 17, 2011

Barnyard Finger Puppets

I finally finished my 2nd set of crocheted finger puppets! I'm noticing a trend of "finally" finishing things...so either I'm really impatient or it actually takes me a long time to finish these things. Here's a link to the patterns. I'll give the pattern for the lamb at the end of this post since I partially made that one up myself.

Now for some disclaimers about the pattern. I still consider myself somewhat of a beginner at crocheting (meaning I've completed less than 10 projects, I don't have all of the different stitches memorized, and I ALWAYS mess up at least once during a project). This pattern doesn't have any complicated stitches (thankfully), but I would be lying if I said it wasn't tedious. All those little features are fairly easy to make, but sewing them on is a drag. I get frustrated when people say things like, "this was so easy!" or "I knocked this out in an evening!" So that will not be the case with these, just being honest. Unless your evening consists of several uninterrupted hours of crocheting. But maybe I'm just slow.

Aaaanyway, the reason I still make them even though it can get tedious is they are so stinkin' cute! I mean check out these feathered friends. I LOVE the comb on the rooster's head! Comb aka red thing on top of a rooster's head - I had to look that one up on Google : )

And they all have cute little tails too!

The whole line-up.

So here's the scoop on the lamb. Last time I made the cute little piggy from the pattern. See?
Awww :) I wish you could see the cute curly tail too. But I had no pink yarn. And I already spent my crafting budget for the next two months didn't feel like buying any, so the lamb was born...er...crocheted. Kind of sad how many brown/tan/khaki/cream yarns I have.

Lamb pattern: make basic body
Muzzle: use pattern for dog muzzle
Ears: chain 4, single crochet in 2nd chain from hook, single crochet in next 2 stitches. Turn and chain 1. Next row - single crochet in 1st stitch; in next stitch do 1 half double crochet, 1 double crochet, and 1 half double crochet; single crochet in last stitch. Fasten off. Fold the ear in half and stitch together. Sew ear to the side of the head.
Face: chain 5, single crochet in 2nd chain from hook, single crochet in next 3 stitches. Turn and chain 1. Next row - 4 single crochet, then fasten off. Sew the face onto the body just above the nose, stitch around the edges of the face.
Tail: gather about 10-12 strands of yarn. Tie together in the center (leave a long tail on the knot to attach to the body), then trim to desired tail length. Fluff the tail (a lot!) to get it to be a little fluffy ball. Attach to the body near the bottom. See the diagram below for a better explanation.
Hopefully my superb drawing skills (hehe) make up for my less than stellar crochet pattern writing skills. Despite all of the griping I did about the details, I think this project is worth the time involved. Just look at their tiny cute faces!
post signature

PS - I'm very sorry for way overusing the word 'cute' in this post. But really...how else would you describe them?